
Chocolate freckles are super easy to make...but also super cute, so they make a great gift idea!
To make freckles you'll just need chocolate and sprinkles. Freckles are 99% chocolate, so make sure you pick a nice one that you like. It can be dark, milk, white, or anything in-between! The milk chocolate ones in my pictures use a block of Whittaker's Creamy Milk, with 33% cocoa.
When I say sprinkles here, I'm referring to hundreds and thousands, or nonpareils, as we need that strong crunch for texture.
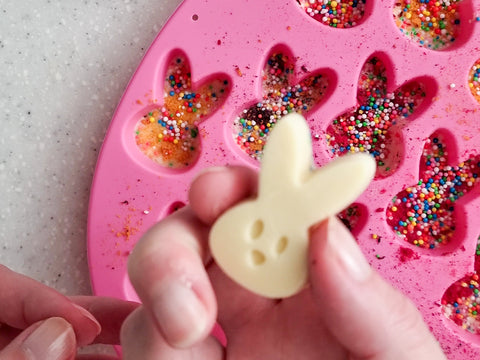
Your freckles will be easiest if you have silicone moulds and a piping bag with a large round tip. That said, any mould will do! I'm using a cute bunny shaped one with smaller shapes, but you could even use a silicone muffin tin to make big discs. If you don't have a mould already, you could even just pour the chocolate out onto a silicone mat for 'freckle bark'. Just make sure it's a flexible surface (e.g. if you're use a baking tray or plate, add a layer of clingfilm or baking paper) to help peel the chocs off after they are set. In fact, I've also seen cupcake liners used for make circular freckles! The piping bag isn't strictly necessary either as you can use a spoon, it will just be messier.
Step One
First, melt the chocolate using either a double boiler (placing chocolate in a heat-proof bowl suspended over boiling water) or using super short blasts in a microwave. Essentially, just avoid any direct heat on the chocolate so you don't burn it.
Note: If you want chocolate that sets fully at room temp, then temper the chocolate. Personally I don't feel the extra effort is worth it here given the chunky thickness means you won't feel the satisfying 'crack' of well-tempered chocolate anyway.
Once the chocolate is a smooth melted consistency, stir and let it sit to cool for a few minutes. After cooling, either decant into a piping bag or use a spoon to pour the chocolate into your moulds. Pour about 8mm-1cm (~1/2") of chocolate into each mould.

To level out the chocolate, you can pick up the mould gently and tap the bottom of the bench, and/or tap the sides.
Step Two
Leave the chocolate to sit for a couple of minutes. and then scatter sprinkles in a full layer over the top.

You want them to sink in enough to become part of the chocolate so they are well stuck (approx 1-4 to 1/3 of the bottom of the sprinkle should sink in) but not sink too far down which is why we let the chocolate cool and sit for a while. It's not the end of the world if they do sink down a bit as they stay crunchy, they just don't look as good!

Step Three
Leave to set in the fridge. Once they are ready, pop the chocolates out of their moulds. Eat one right away as a tester (it's only fair).

Taking it further: Adding fruit powders
You can add extra flavours and textures while the chocolate is still runny if you'd like - personally I love to add fruit powders (ground freeze dried fruit) in a layer before the sprinkles over white chocolate.

They add super intense burst of fruity flavours, and now you can totally call these freckles a health food.

Here I have used passionfruit (orange), raspberry (pink) and blueberry (dark purple).

You can purchase these as pre-ground flavours from baking stores, or pulverise your own freeze dried fruit in a blender (it may not be quite as fine, but for this usage it doesn't really matter.)
Enjoy!